Showing posts with label flowers. Show all posts

Sunday, 18 March 2012

Photo frame with Royal & Chrysanthemum flowers


Back with a photo frame board decorated with royal flowers and chrysanthemums. Can be gifted to loved ones and they can make a box frame/ deep frame of their choice. I am sure the colours with their photograph will keep the memory fresh and bright.
Made this specially for my niece and nephew (twins) living in NYC.


Our photo taken last year at our housewarming party

I think this frame will look complete with their photograph :). Hope to send it soon.
PS: Sorry for the not so good quality of pics.

Wednesday, 29 February 2012

3D effect flowers

Isn't complete according to me. Any suggestions?? (I have a photograph attached of a draft for the same)
But had to share the 3D effect flowers. I have tried to use mono-theme (warm colours) except for the leaves. Have used 3mm strips of 24 inches to make each petal. Followed with tight rolls, and using the back of a pen (round end) shaped the petals giving a 3D effect. This is evident if you look closely at the buds.
These flower effects, if I am not wrong, were conceived by ManuK Please visit the blog for some exceptional work.

The leaves are particularly interesting, I have used the crimper on the dark green (3mm, 12-18 inches) first and then quilled loosely to form the inside. After which I have used light green to tight quill and shape the leaf. It is simple but look elegant.
Complete composition
Close-up of the 3d effect and the crimped leaf
My husband thought they were real flowers. I take it as a compliment :)

Over-exposed photo 
The above photo which is over-exposed by choice has a lot of character, shows the shadows and highlights very beautifully.
In the making
Comments welcome!!!

Friday, 24 February 2012

Royal flowers

I am in love with this new technique!  It brings quilling to a higher level of intricacy and artistry.
It is originally demonstrated by Asma Ahmad Bahari: Royal Flower.  And while you are at her blog browse through her wonderful collection of greeting cards!

So coming back to my project, I thought to myself, why not give these flowers my personal touch. And believe me they look beautiful and different each time you make them yourself. Maybe because of a different colour or different shape or maybe just your personal touch and passion for art. They look unique and elegant!!
Here is my composition of a greeting card using these pretty Royal flowers.


If you search for Royal flowers on Google you will see many different design one could do with the inside of the flower. As very rightly said, 'A man lives by imagination' - Henry Ellis
Have fun :) & do comment!!

Saturday, 18 February 2012

Starburst flowers- Greeting Card!!

These starburst flowers (complete tutorial) by Patricia Zapata, via Whip Up (on my blogger list) were made using red stock paper. I simply, loved the look and the ease you can make them. And the leaves are done using two shades of green, folded into half along the length and then using a forcep bent along the width. Again, a complete tutorial is shown by Inna Dorman here.


I have added some fillers to complete the greeting card.

Close-up of the flower

This was made for my Ajoba (Grandfather), who is celebrating his 85th Birthday next week. We wish him the best of health and a happy life ahead of him!! We love you Ajoba :) 

PS: The card is in the post and should reach you soon but this is for the record!!! :)

Saturday, 11 February 2012

Frame Decorated with Quilling

Simple IKEA frame decorated with paper quilling! 
The petals were made using the husking technique (Husking technique ).
I have used 3 mm paper strips (orange and light blue), and then cut each in half lengthwise. I made 12 orange petals and 4 light blue ones.
The leaves were made in similar fashion (husking and then curling using needle).

 
Closer view of the flower!!!
PS: That is a photo of me when I was a toddler!!


Sunday, 22 January 2012

Cherry Blossom: Sakura

Have been busy making this Cherry blossom which is also known as Sakura. But once it was done I just didn't get the time to upload it on the blog. And today that I have time, thought I must not let go of the opportunity to wish everyone with best wishes for the new year. Happy Chinese New Year!!!

Close-up of the bird


Fresh light on the Sakura


One would think of the Cherry blossom as a reflection of Japanese culture and you would wonder why Cherry blossom for Chinese New Year. 
Well, there is a connection, Sakura does naturally grow in China. And the two most famous cherry blossom parks in China reflect Japan's donation during the first half of the 20th century ( Longwangtang Cherry Blossom Park & Wuhan University).
If you happen to visit China during spring, think about attending the Cherry Blossoms Festival. 


PS: An adaption from Inna's Cherry blossom

Saturday, 14 January 2012

Recycled Pen holder Ideas

When I was in Glasgow doing my PhD, I had come across some homemade pen holder ideas. I had loads on my hit list then and I had made one of them. I thought I must share some ideas with you all too.

Below is the photo of the one I did using a magazine and some coloured card stock. I used a cola plastic bottle and cut it into the appropriate size I wanted (this is about 10cm in height). Then I made some tight rolls out of magazine papers of different sizes and stuck them on the bottle and let it dry. Later I painted it with some acrylic colours. In the mean time, I made quilling roses of different colours and punched some leaves.
How to make quilling roses? (here is a tutorial). Finally the roses and leaves were glued on the holder.
Pen holder made from paper


On the bright side...


Other pen holders on my list-

Recycle a phone book/ pharma catalog into a unique pen holder.
http://www.chicaandjo.com/2009/02/24/recycle-phone-book-into-pen-organizer/

Recycle some pencils and stick them together and paint them white or any colour for that matter.
http://www.thisnext.com/item/9049E372/7F5D8AFA/Take-Note-Desk-Accessories

PS: I am glad that this pen holder was instantly liked by my then flatmate, Diana who just loved the way it looked and thus I gifted it to her once it was done. :)) Hope you can gift your near and dear ones too.

Sunday, 8 January 2012

Simple Quilled Flowers with A Paper Frame

I have created a simple arrangement of quilled flowers this time :).
Simple Quilled Flowers

I have used 3mm wide strips for the dark green leaves and 1mm for the light green ones. And 1cm strips for the fringed flowers. The fringe is very dense and an adaptation from the original which can be learnt here (Fringed flowers).
This work isn't an exception !!! But what I enjoyed and learnt the most was to make your own paper frame. To frame this picture, I used a thick card stock. Step-by-step instructions for a frame like this can be found in "How to make a simple paper frame". 
Size of the finished picture is about 27 x 18cm.
Inna's creations was the blog that has inspired me too much to get into quilling. One should for sure peep into her site to see her creations.
I like the finished project, hope you guys like it too!
Ciao

Thursday, 22 December 2011

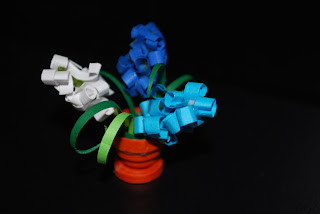
Miniature Quilled Hyacinths

I was bored after decorating the house for Christmas and didn't know what to do next.
So I forced myself into making something intricate and small. Well it turned out beautiful and superb as a show piece.
Here are some photographs of the paper quilled hyacinth bunch (they look close to hyacinths, I think :)).
Bunch of Hyacinths

small as it gets!
I decided not to show how to make them, but instead put up a youtube video made by yoyomax12, she is brilliant with her craft.
http://www.youtube.com/watch?v=RPb4naH4YmE&feature=youtu.be